Using a Linux Server for Time Machine Backups
Posted on 12 Sep 2015Since Mac OS is one of my daily operating systems, I use the in-built Time Machine software for backups, and since I have a server running Linux it seemed apt to make it Time Machine compatible.

To make a Linux server or old laptop or something a Time Machine, you can install Netatalk (plus some other stuff) on it. Netatalk is an open source implementation of Apple’s AFP file serving protocol, basically it allows a Linux computer talk to a Mac.
My Linux server is running Debian 8, so all of the following instructions will be for that. So if you do this and something breaks on your system (that isn’t Debian) don’t blame me. ;)
Downloading & Installing Netatalk
Since Debian 8 (and therefore everything down the Debian-based tree) ships an incredibly outdated version of Netatalk, you’ll need to compile and build the latest version from source.
So you’re gonna need all the packages for building more packages plus all of Netatalk’s build dependencies, which you can install with the following command.
sudo apt-get install build-essential devscripts debhelper cdbs autotools-dev dh-buildinfo libdb-dev libwrap0-dev libpam0g-dev libcups2-dev libkrb5-dev libltdl3-dev libgcrypt11-dev libcrack2-dev libavahi-client-dev libldap2-dev libacl1-dev libevent-dev d-shlibs dh-systemd
Next, download the latest netatalk from the git source code repository, provided you have git installed.
git clone https://github.com/adiknoth/netatalk-debian
Enter the now-present source code directory & build the Debian packages from the source code with the following commands:
cd netatalk-debian
debuild -b -uc -us
cd ..
If all goes well, this will create three packages: libatalk-dev_*_amd64.deb libatalk16_*_amd64.deb and netatalk_*_amd64.deb where * is the current version number. To proceed you only need to install two of them.
sudo dpkg -i libatalk16_*_amd64.deb
sudo dpkg -i netatalk_*_amd64.deb
Thanks to Daniel Lange for instructions on building netatalk for Debian.
Along with Netatalk you’ll need a few other necessary packages, namely the Avahi daemon, for the Time Machine to work properly.
sudo apt-get install avahi-daemon libc6-dev libnss-mdns
Next, on to configuring your server and your Mac.
Configuring Your Server
1. Choose a Data Folder
First you need to pick a directory on your server for your Time Machine data and if it doesn’t already exist, create it
I’ll be using /data/timemachine/ for these instructions, if you prefer another location remember to change it in any of the following.
sudo mkdir -p /data/timemachine
2. Setup a User Account
You’ll also need Time Machine user account on your server which you can log in with on your Mac. Create one and assign it the previously-created data folder as its home directory and assign ownership of that directory to this user.
I’ve chosen to create a user timemachine, but you can pick anything you like.
sudo adduser --home /data/timemachine timemachine
sudo chown -R timemachine:timemachine /data/timemachine
You’ll also need to set the password for this user.
sudo passwd timemachine
3. Configure Netatalk
Next, you’ll configure Netatalk. Open the existing afp.conf configuration file for editing that is stored in /etc/netatalk/. You can do it in the command line with:
sudo nano /etc/netatalk/afp.conf
You can copy my sample configuration exerpt below, editing it to suit your setup. You simply add it to the end of afp.conf when finished (and save).
[TimeMachine]
# is this machine a time machine?
time machine = yes
# directory for time machine data on server
path = /data/timemachine
# the max size of the data folder (in Mb)
vol size limit = 980000
# users with access to time machine
valid users = timemachine
4. Enable Netatalk & Avahi
Next, using the venerable systemd, you can enable the netatalk and avahi-daemon services:
sudo systemctl enable netatalk.service
sudo systemctl start netatalk.service
sudo systemctl enable avahi-daemon.service
sudo systemctl start avahi-daemon.service
Okay, now switch over to your Mac.
Mac OS Setup
By default Mac OS doesn’t show “unsupported” or non-Apple Time Machine network drives, but you can easily change that with one Terminal command:
defaults write com.apple.systempreferences TMShowUnsupportedNetworkVolumes 1
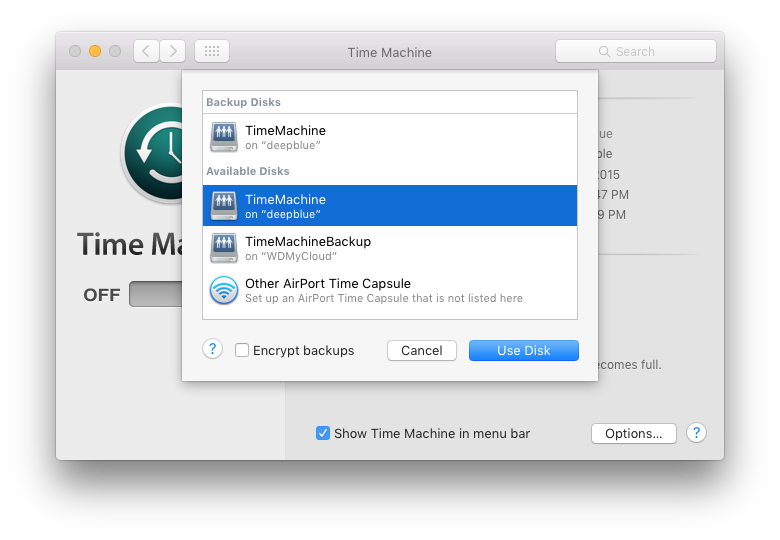
If everything went well after all this, you should now be able to choose your server in the Time Machine preferences when selecting a disk.

You’ll also get a login prompt when attempting to access it, just use the username and password for the Time Machine account you created on your server.
If everything has worked thus far, and you are able to perform backups then congrats! You now have a Linux-powered Time Machine.